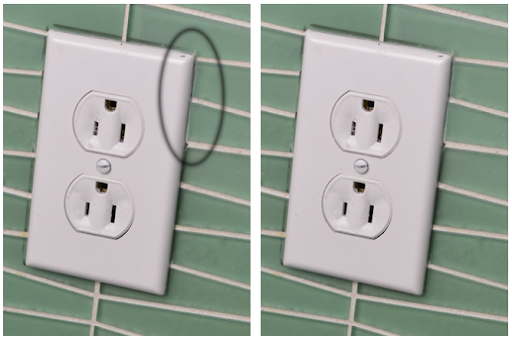
Glass shadowing around the edges of outlet and light switch covers is more common than you may think. Luckily, there are two main things you can do to prevent this shadowing. Ideally, you’ll make the correct cuts the first time, but the shadowing can be fixed even if installed incorrectly.
If you have any questions about your glass tile or installation, check out our installation guide. If you would like some help from one of our tile experts, don’t hesitate to contact us!
Understand the Product
Let’s get started! Island stone tiles are manufactured to insure a premium quality look that will not deteriorate over time. To achieve this unparalleled quality, we use a multilayer construction that has the color applied to the back of the glass for added protection in case the surface of the tile gets scratched. The diagram below shows a side crosscut of our glass to help you better understand the construction.
In many cases, our glass is used on surfaces that have joints or panels such as outlet covers. In all cases, there is one hard rule.
Never install any material to overlap or cover the glass
Overlapping the surface of the glass creates a dark area that absorbs light from the edges creating a shadow that extends beyond the edge of the product overlaying the glass.
Below is a classic example of the right and wrong way to install Island Stone glass using a common circumstance of tiling around an outlet.\
Wrong Installation Technique
In this case, the installer has cut the glass tile to closely around the plug. Image 2 shows how far the outlet cover will cover the edge of the glass.
Image 3 shows how the shadow caused by the light getting absorbed creates an undesirable dark area around the edge of the cover.
Correct Installation Technique
Prior to installing, the installer has cut the tile so that the opening around the outlet is just slightly smaller than the actual cover. When installing, the installer has insured that the cut edges are grouted.
Pro Tip: You can also paint the surface with a white opaque paint prior to installing to refract light from the edge of the tile.
Notice in Image 3 there is far less shadowing occuring around the edge.
Correcting the Issue After Installation
Correcting the issue after you’ve installed is more difficult, but not impossible. You’ll need a dremel with a diamond blade and a steady hand.
While not recommended, there are ways to resolve the shadowing issue after the tile has been installed. This includes removing and replacing all the pieces affected, or cutting pieces to the edge of the cover.
Dremel with Diamond Blade
While cutting, a spray bottle was used to keep the tile wet. Use all recommended safety equipment, including eye protection, when cutting tile. Of course, make sure the outlet is not active!
Cover the surrounding area to avoid getting the cover or plug wet. Cut slowly and make sure to cut all the way through the tile before removing the cut piece to avoid chipping the tile.
Image 1 shows the results from cutting two pieces of tile. For actual installation, all pieces would need to be cut. Image 2 shows the application of a permanent white opaque surface to the cut edge of the tile. This is important to refract rather than absorb the light.
Results: The area circled shows normal shadowing versus the uncut area showing a much greater shadowing effect. Complete the cuts for all pieces affected to achieve a final product of no shadows!

